A regular tetrahedron has four faces, four vertices and six edges. Each face is an equilateral triangle. Since an equilateral triangle has three sides of the same length and three equal angles, so then do the faces of the tetrahedron.
We will make one using coffee stir sticks, pipe cleaners and wire nuts. The wire nuts make it easy to create a successful model with normal dexterity. Working in teams of two is recommended and the assembly instructions are illustrated that way. To make one you will need:
- a. Six coffee stir sticks.
- I find them at party supply stores where they are also called sip-stirs or all purpose stirs. These are five inches long. Other lengths are ok but that will affect the length of the pipe cleaners.
- b. Six pipe cleaners.
- If necessary, cut them to six inches long each. They should be one inch longer than the stir sticks. If your stir sticks are something other than five inches long then add an inch to determine the length of the pipe cleaner.
- c. Four wire nuts.
- These are what electricians use to connect wires. They are commonly available in hardware stores and are color coded by size. Use the blue ones.
To prepare to make the model;
Put a pipe cleaner through the center of each of the stir sticks. Notice that the pipe cleaners overhang the ends of the stir sticks. That is how we will build our figure, by connecting these ends with the wire nuts. There should be a half an inch of pipe cleaner sticking out of each end of the stir sticks.
Take any one of the stir sticks, call it the main rib, mark it with a pen or put a small piece of tape around it. That way we can tell it from the others.
Bundle two more ribs together with the main rib. Do it so that the ends of the pipe cleaners match up. Pick one end of the bundle. Put a wire nut over the three pipe cleaners and twist it till the three ends are joined together.
FIGURE 1 ATTACHING A WIRE NUT
Bend the three apart at the wire nut. Take care not to bend the stir stick. Take two more ribs and do exactly the same thing again to the other end of the main rib. Bundle them so that you once again have three free ends together, the main rib and the fourth and fifth ribs. Put the second wire nut over these three pipe cleaners and twist it till the three ends are joined together.
FIGURE 2 ATTACHING THE SECOND WIRE NUT
Open up the free ends until it looks like a sawhorse. The main rib forms the backbone of the sawhorse and the other ribs form four legs.
FIGURE 3 THE SAWHORSE
Pick one end of the main rib to be the head of the saw horse and the other to be its tail. There should be two legs on the left side of the main rib and two on the right.You have one rib left over, the sixth rib. Take two free ends from the same side of the sawhorse, left or right, and pinch them together. Take one end of the sixth rib and add it to these two so that the ends match up. Put on a wire nut, as before. You will have to bend the ends of the pipe cleaners to get them to line up.
Now you have three free ends left over. Put them together and add a wire nut, the last one. Straighten out the wire nuts for appearance. If a face of the figure is resting on a table, the opposite wire nut should be pointing straight up.
FIGURE 4 ADDING THE LAST RIB
There you have it. You have just made a wireframe regular tetrahedron. Now go and dunk it into a soap bubble solution! What makes it special?
FIGURE 5 THE COMPLETE MODEL
SOAP BUBBLES are great fun. The tetrahedron can be dipped repeatedly into a soap solution. The solution for our demonstrations consists of dishwashing soap, glycerine and distilled water (especially if your local water is hard). This will help to make the bubbles last longer. To dip the models, hold by the wire nuts. Keep fingers out of the solution. Otherwise, after a while the oil from the skin will tend to ruin it.
For more dramatic demonstrations, take a straw and dip it into the soap solution. It can then penetrate the planes of the bubbles without breaking them. If you put the end of the straw on a plane you can blow (gently) a bubble in the figure. For the cube, that should yield a smaller "cube" of soap film at the center of the one you made. Here are photos of soap films in one of our steel models of the Platonic Solids. The last two examples were made to fluoresce and photgraphed in black light. If you would like to know how to make your soap film glow in black light, just email me and I'll tell you the secret.
click on this link to send me an e-mail, mike@m2solids.com

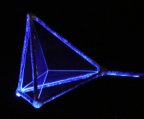
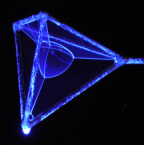
SOAP FILMS IN A TETRAHEDRON
SUBFIGURES can be created on these models. Use pipecleaners to connect the midpoints. The octahedron can be made in a similar manner to the tetrahedron. It would have four pipecleaners connected by a wire nut at each vertex. Connecting its midpoints defines the cube, its double. You can, of course, make the figures smaller by cutting the pipe cleaners and coffee stirs in a safe manner. Look at the models in the DIMENSION series if you need a guide.